Friday was my last day doing astronomy with the 3-4 graders at Peregrine School. The one standard I hadn't yet covered was gravity, so we did gravity before the break (this post) and after the break we discussed nuclear fusion in the Sun's core (next post).
I reviewed some ideas about motion we had discussed last year. If you roll a marble, you expect it to go in a straight line unless something (another kid, perhaps, or a wall) interferes by pushing (exerting a force) on the marble. That's Newton's first law of motion. I then put a donut on a string and spun the donut in a circle over my head. What will happen if the string is cut? Will the donut continue in a circle, fly off in a straight line, or fly off in a curve? We took a vote. I always clarify that the question is about what happens immediately, not about what happens eventually, like the donut falling due to the gravity in the room. This means that when we do the experiment, they have to really pay attention!
In reality I don't cut the string, but the string pulls through the soft donut, and it flies off in a straight line---Newton's first law again. This is a pretty vivid demonstration that the Moon wouldn't keep going around the Earth, nor the planets around the Sun, unless there was a force keeping them from flying off in a straight line. Kids this age already know that we call that force gravity, but gravity is also the force that makes things fall when I drop them. Why do we call these two forces by the same name?
I also have a tennis ball on a string so I can demonstrate circular motion as much as needed. I do this and ask the kids what direction the force must be in. It must be towards the center of the circle, where my fist is holding the string. That's clear because the only direction a string can exert a force is pulling along the string! So whatever force is pulling on the Moon, it must be pointed toward the center of the Earth. And that's exactly what we observe about gravity on Earth! (It helps to draw an Earth and how the arrow of gravity points in your location vs in, say, Australia.) So it's quite plausible that these two forces are really the same force.
To bolster the argument that these are the same force, we should look not just at the direction, but also the strength. I had the kids whirl the tennis ball on a string at various speeds, and feel whether the higher speed requires more force, less force, or the same force (the answer is more). So let's look at the planets' speeds around the Sun and see if we can relate that to the force of gravity. I asked the kids for suggestions as to what would affect the planet speed. The two main suggestions were planet size, and planet distance from the Sun. It would have been great to investigate both of these possibilities, but we were running short on time so we just did planet distance from the Sun. I had the kids make graphs of planet speed vs planet distance from the Sun. We took our time doing this right, figuring out how to draw the axes with reasonable scales, and adding planets one by one, starting with the most familiar ones.
A pattern did emerge: more distant planets are slower, as the graph below shows.
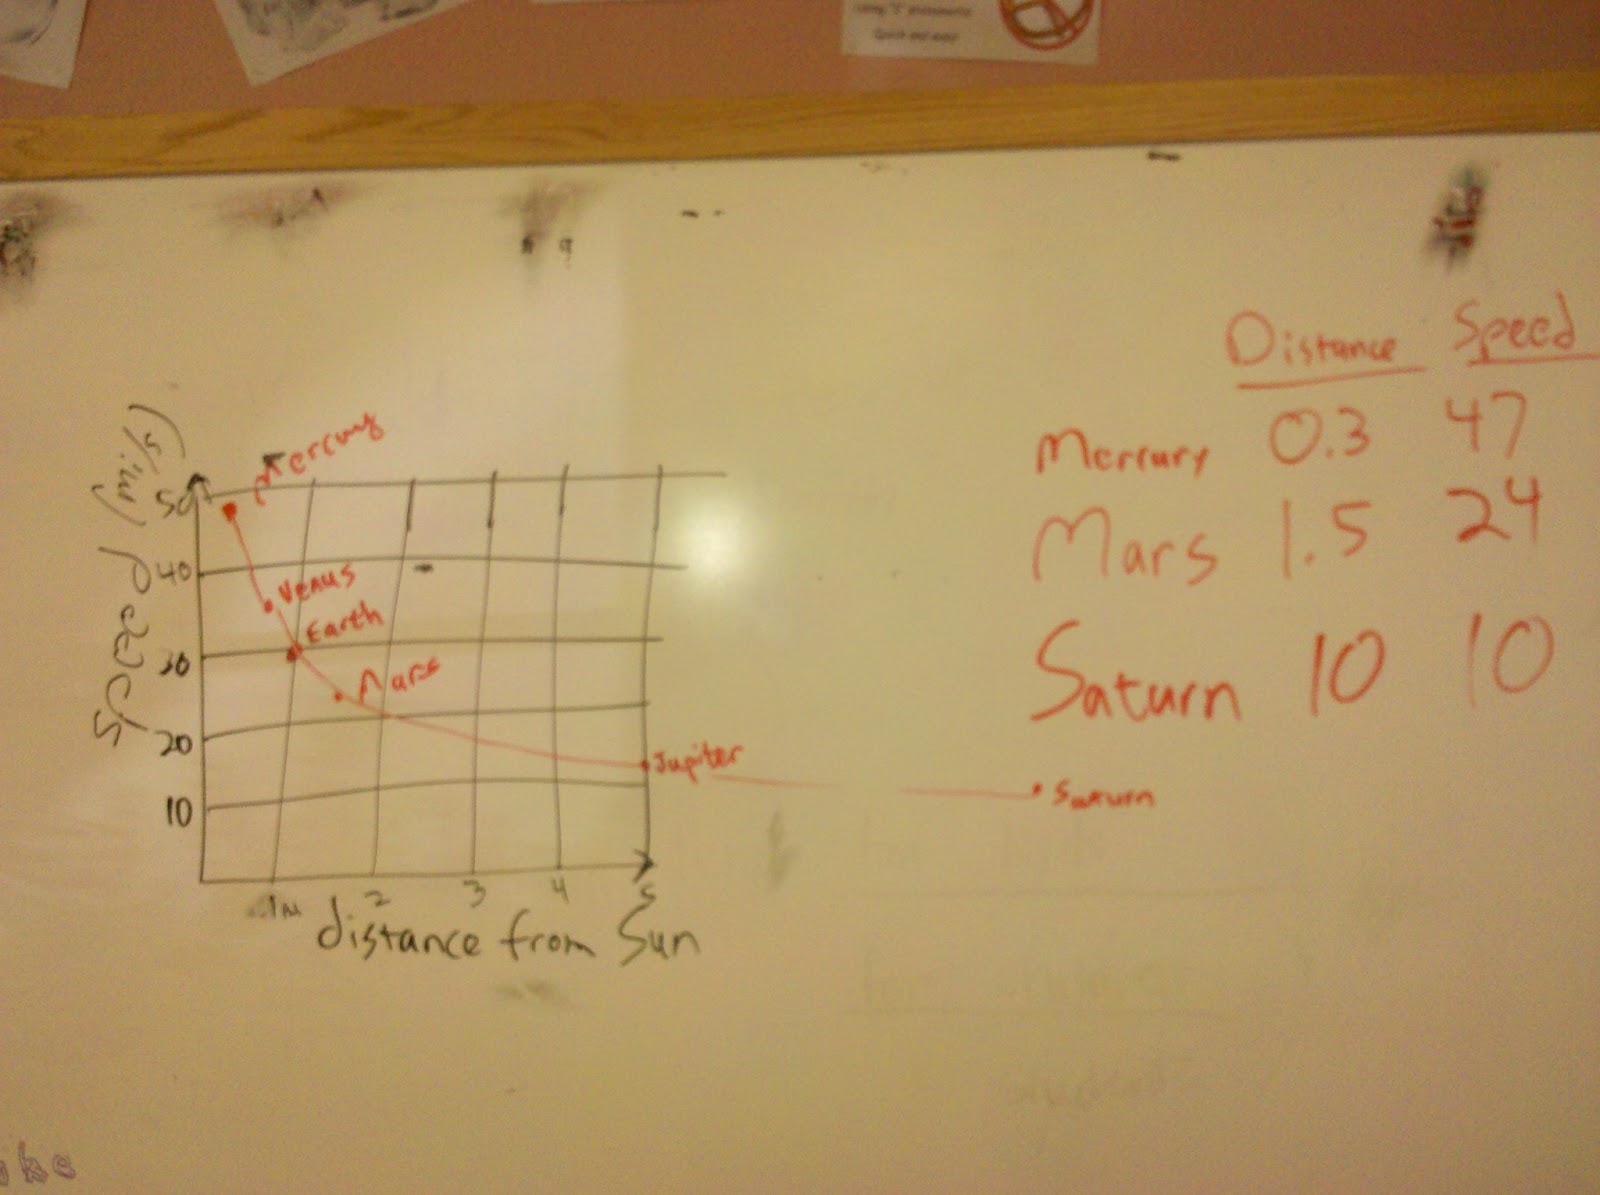
By our tennis ball experiment, slower circular motion implies a weaker pull (less acceleration). Therefore this graph implies that more distant planets feel a weaker pull, and planets closer to the Sun feel a stronger pull. Does this make sense if the Sun's gravity is what keeps the planets from flying off in straight-line paths? The kids agreed that it did.
[If we had also made the graph of speed vs planet size, we would not have seen such a clear pattern. It happens that the outer planets tend to be bigger, so that there would be a tendency for bigger planets to be slower, but it would only be a tendency, not a law, because the biggest planet happens to be the nearest (fastest) of the outer four. And the pattern would really be broken if we also included Pluto, which is a very distant (hence very slow), small object, providing a counterexample to the fast inner planets which happen to be small and which therefore might give someone the false impression that small means fast.]
I liked this 40-minute activity and I think it worked well. I did simplify some details to avoid getting bogged down (eg the distinction between force and acceleration), but I think it was appropriate for 3-4 graders who wanted to focus on astronomy rather than physics. We also got in some more practice with graphs, which is important. And we learned something which in Newton's time was revolutionary: the same laws of physics which we can deduce here on Earth also apply to objects in the sky. This was one of the most wonderful discoveries in the history of science, and it's what allows us to understand the universe.
Showing posts with label Newton's laws of motion. Show all posts
Monday, June 10, 2013
Friday, October 26, 2012
Balance, and floating vs sinking
Today in the 1-2 grade room we had a blast with some of the ideas we
need to use in making the water feature.
First, balance. I brought in two-meter-long sticks on pivots, along
with sets of weights of various sizes, and had the kids hang weights
in different places and then see where they had to place other weights
to balance it out. They quickly discovered that a small weight can
balance a large one, IF it is placed at the end of a long arm. This
was a really good exercise because, in contrast to some of our
previous ones, I had enough equipment for each child to explore
completely on his/her own.
The pre-snack period culminated with two capstone events:
(1) I gave the kids a worksheet in which I drew balance beams
with a weight on one side (varying the size and position of the
weight), and they had to draw the weight (size and position) they
would put on the other side. Mostly they got it right, and in the few
cases where there was confusion we had the equipment right there to
check if their drawing represented reality. (2) I demonstrated how
balance facilitates rotation. You can see a video I made about this
demo at the end of this blog post from last year. As kids went to break,
some of them commented how this demo is like the Moon going around the
Earth, and asking whether the Earth wobbles a little as it does so.
The answer is yes, and so does the Sun as the planets (Jupiter has the
biggest effect) go around it. Therefore, if you saw a star which was
wobbling, what could you conclude about it? Right, it has planets!
This is really how astronomers do it; the vast majority of planets are
too faint to see directly given the glare of their host stars.
Post-snack, we switched to fluid mechanics. We started by reviewing
what we learned about pressure last time, focusing on why water
doesn't fall from a straw when you cover the top with your finger. I
then showed the same idea in slightly different form: with two 2-liter
soda bottles screwed together, water does NOT fall from the top one to
the bottom one (it may drip, but it doesn't make the waterfall you
might expect in an open-bottle situation). The water doesn't fall
because for the water to go down, the air in the bottom bottle has to
move up, and the two get in each other's way. We then figured out how
to make them not get in each other's way: swirl it to make a "tornado
in a bottle." The air goes up through the middle while the water
swirls down around the outside.
We then took some time for each kid to make his/her own tornado in a
bottle, with the option of coloring and/or glittering the water. This
was great fun; the kids were really into it and came up with some
pretty (and/or Halloweeny) combinations.
Next, we studied floating and sinking, following more or less the
script from one of my Primaria sessions last year (adding a bit of
sophistication such as introducing the word density). But we had time
only to get to the egg in the salt water. We'll do the rest next time.
At the last minute, we stumbled into a nice connection between the egg
and geology. Teacher Pa said that the way to tell if an egg has gone
bad is to see if it floats (in non-salted water). Linus had said just
5-10 minutes before that pumice is a rock that floats because it has
lots of gas bubbles in it. So the connection is that an egg which
floats (without the help of salt) probably has gas bubbles in it,
which clearly is a sign that it's going bad.
Monday, October 15, 2012
Understanding the gravity of the situation
Last Friday with the 1-2 graders we reviewed and extended our
observations of force and motion which we began two Fridays ago,
before the Yosemite trip. Because it had been two weeks, we started
with quite a bit of review, which I did by asking the kids questions
rather than lecturing to them. We observed the motion of a rolling
ball in order to change the context from last time (when we used a
hoverpuck or a marble shot out of a blowgun).
I had them observe and draw some motions. This addressed California
Grade Two science standards 1a and 1b, as well as built the case for
the following argument.
By observing a ball thrown up in the air, we concluded that there is a
force on it even when I am not touching it, and that that force is
simply gravity. I then repeated the donutapult demo to refresh their
thinking on how something goes in a circle only when there is a force
on it; if there is no force on it, it will go off in a straight line.
Then we talked about the Moon and how there must be a force on it
because it goes in a circle around the Earth. That force is also
gravity!
(I think the following was too advanced, but we did discuss it.
Gravity always points to the center of the Earth. One student is
going back to Korea soon, so I drew Davis and Korea on a globe and
showed how this must be the case. Then I noted how the force on the
donut also points to the center of its "orbit" because that is the
only direction the string can pull. So there is very strong reason to
think that the force on the Moon is Earth's gravity, the same force we
know and love, that makes things fall when we drop them! [Standard 1e])
After the break we discussed how to send forces in different
directions and in different amounts by using simple machines such as
levers, pulleys, and gears. I had brought in the Gears!Gears!Gears!
toys earlier in the week, so they easily got the basic idea of this
standard (1d). But I lost them when I got into the details of
levers...they weren't able to predict where to place a lever and a
fulcrum to perform a given task, nor were they able to draw arrows
indicating the sizes of the forces at the different ends of the lever.
And I didn't really have the equipment handy to do real hands-on work
with that, so I may do this again this Friday with better equipment.
Saturday, September 29, 2012
Newton's laws for 1-2 graders
Friday I spent an intensive morning with the 1-2 graders working on Newton's
laws. The format was quite a contrast from last year when I had 20 minutes with
each of three mixed-age groups! That was insanely rushed. Still, I followed more
or less the same format as last year, with the hoverpucks, the donutapults, and the carts, so I won't rewrite all that here. I added a few things, which I will describe here, but mostly we used the time (45 minutes before morning break and an hour after) by going a lot more slowly and thoroughly.
I knew it was going to be a long morning for them, with a lot of different things to
pay attention to, so I started with an overview. I started by writing three goals on the board and we talked about what goals are. I told them that if we accomplished all the goals they would get a present at the end. The goals were:
After break, I brought out a new toy which I had made earlier in the week by softening a PVC pipe in boiling water and bending it into a circle (curving it around a bit more than one full loop so that it clearly has two ends). A marble fits inside the pipe and I blow on it like a dart gun. When the marble comes out, does it continue curving around that circle, go in a straight line, or something in between? This was another really fun demo. [Note that I spent two hours making the darn thing, because this was my first attempt at softening PVC, and I ruined two pots. Dedicated teachers spend much, much more prep time than most people imagine!]
Then we turned to the carts as per last year's agenda. A new ingredient I added here is the leafblower on a skateboard. We can trust the leafblower to always push against the air with a constant force, so stacking the skateboard with different weights nicely demonstrates Newton's second law. We also heard an interesting misconception from one child: that the leafblower/skateboard had to be near a wall to push off the wall. So we discussed how to design an experiment to test that, and how the experiment showed that the leafblower pushes against the air, not the wall.
This completed the "make a model to explain these observations" goal: objects don't change their speed or direction unless acted on by a force (Newton's first law); a bigger force produces a bigger effect on a given object, and a given force produces a bigger effect on a lighter object than on a heavier object (Newton's first law). These kids aren't really ready for a deep understanding of Newton's third law, so I summarized it as "things push back when you push on them." That way of summarizing it may do more to prevent injuries than to improve their understanding of physics, but I felt that I was starting to lose them and that we should move on to our third goal.
The leafblower was indeed a nice segue to "figure out how to measure pushes and pulls" because when students pushed a heavy cart and then a light cart with the same force to observe the same pattern (a given force accelerates a light object more than a heavy object), they had some trouble really pushing with the same force on each cart. Their muscles weren't very well calibrated. So I asked how we could measure the size of a force. I pointed to the scales we had used earlier, but this didn't generate any ideas other than "use a scale." So I got a popsicle stick and showed that if I press on both ends lightly, it bends a little; if I press more it bends more; and if I press very hard, it breaks. This is a rough way to measure force.
We can make it more precise by using a spring. I hung a spring from the whiteboard tray and asked them what would happen if I hung a small weight on it, two small weights, etc. (A weight is another thing we can trust to always pull [down] with the same force.) I had taped a piece of blank paper hanging down from the whiteboard tray, and I used that to start to build up a scale with tickmarks and numbers. Then we broke into two groups (I had only two springs) to construct two scales. Unfortunately, my group overloaded their spring and broke it rather quickly. Note to self: bring more, and stronger, springs next time. In any case, we did construct reasonable scales so they achieved their third goal and earned their reward: each child got a brand new, professionally manufactured spring scale. Before they could play with them, Teacher Pa made them record some of what they had learned in their science journals.
I'd never done the "measuring force" activity before, and I think it went well. The kids did play with the scales after recording in their journals, even a bit into recess time, so that was a good sign of engagement. Linus and Malacha experimented with multiple springs set up in parallel and in series. They observed, for example, that when two springs hold up a weight, each is extended only half as much as it is when it has to hold the same weight alone. This is because each has to hold only half as much weight.
Some kids expressed interest in having a hoverpuck at home. They are only $20 and are sold under the name Kick Dis.
laws. The format was quite a contrast from last year when I had 20 minutes with
each of three mixed-age groups! That was insanely rushed. Still, I followed more
or less the same format as last year, with the hoverpucks, the donutapults, and the carts, so I won't rewrite all that here. I added a few things, which I will describe here, but mostly we used the time (45 minutes before morning break and an hour after) by going a lot more slowly and thoroughly.
I knew it was going to be a long morning for them, with a lot of different things to
pay attention to, so I started with an overview. I started by writing three goals on the board and we talked about what goals are. I told them that if we accomplished all the goals they would get a present at the end. The goals were:
- observe how things move
- make a model to explain these observations. I phrased it this way because the previous time I had worked with them one-on-one, we made models of how the mystery tubes work. I wanted to draw an explicit parallel: a few simple connections will explain and unify a whole lot of observations.
- figure out how to measure pushes and pulls (forces)
After break, I brought out a new toy which I had made earlier in the week by softening a PVC pipe in boiling water and bending it into a circle (curving it around a bit more than one full loop so that it clearly has two ends). A marble fits inside the pipe and I blow on it like a dart gun. When the marble comes out, does it continue curving around that circle, go in a straight line, or something in between? This was another really fun demo. [Note that I spent two hours making the darn thing, because this was my first attempt at softening PVC, and I ruined two pots. Dedicated teachers spend much, much more prep time than most people imagine!]
Then we turned to the carts as per last year's agenda. A new ingredient I added here is the leafblower on a skateboard. We can trust the leafblower to always push against the air with a constant force, so stacking the skateboard with different weights nicely demonstrates Newton's second law. We also heard an interesting misconception from one child: that the leafblower/skateboard had to be near a wall to push off the wall. So we discussed how to design an experiment to test that, and how the experiment showed that the leafblower pushes against the air, not the wall.
This completed the "make a model to explain these observations" goal: objects don't change their speed or direction unless acted on by a force (Newton's first law); a bigger force produces a bigger effect on a given object, and a given force produces a bigger effect on a lighter object than on a heavier object (Newton's first law). These kids aren't really ready for a deep understanding of Newton's third law, so I summarized it as "things push back when you push on them." That way of summarizing it may do more to prevent injuries than to improve their understanding of physics, but I felt that I was starting to lose them and that we should move on to our third goal.
The leafblower was indeed a nice segue to "figure out how to measure pushes and pulls" because when students pushed a heavy cart and then a light cart with the same force to observe the same pattern (a given force accelerates a light object more than a heavy object), they had some trouble really pushing with the same force on each cart. Their muscles weren't very well calibrated. So I asked how we could measure the size of a force. I pointed to the scales we had used earlier, but this didn't generate any ideas other than "use a scale." So I got a popsicle stick and showed that if I press on both ends lightly, it bends a little; if I press more it bends more; and if I press very hard, it breaks. This is a rough way to measure force.
We can make it more precise by using a spring. I hung a spring from the whiteboard tray and asked them what would happen if I hung a small weight on it, two small weights, etc. (A weight is another thing we can trust to always pull [down] with the same force.) I had taped a piece of blank paper hanging down from the whiteboard tray, and I used that to start to build up a scale with tickmarks and numbers. Then we broke into two groups (I had only two springs) to construct two scales. Unfortunately, my group overloaded their spring and broke it rather quickly. Note to self: bring more, and stronger, springs next time. In any case, we did construct reasonable scales so they achieved their third goal and earned their reward: each child got a brand new, professionally manufactured spring scale. Before they could play with them, Teacher Pa made them record some of what they had learned in their science journals.
I'd never done the "measuring force" activity before, and I think it went well. The kids did play with the scales after recording in their journals, even a bit into recess time, so that was a good sign of engagement. Linus and Malacha experimented with multiple springs set up in parallel and in series. They observed, for example, that when two springs hold up a weight, each is extended only half as much as it is when it has to hold the same weight alone. This is because each has to hold only half as much weight.
Some kids expressed interest in having a hoverpuck at home. They are only $20 and are sold under the name Kick Dis.
Friday, March 16, 2012
Kindergarteners in Motion
Today at Primaria I did Newton's first and second laws of motion, much
as I did them at the elementary last fall. If you read that entry, I
followed that plan up to and including how the Moon is attached to the
Earth by gravity.
Before doing that, I did a quick advertisement for the
tornado-in-a-bottle building activity I want to do next time. We had
earlier, in the context of pressure, shown how water will not fall out
of a straw if you hold your finger over the top. This is because for
the water to get out, air would have to get in to fill the space. But
air can't get in when your finger is over the top. So today I brought
in a giant size version of this: two 2-liter soda bottles screwed into
a connector, with one half-full of water. Turn it upside down, and
the water doesn't fall because the air need to switch places but get
in each other's way. Now the cool part: swish the water around and it
forms a "tornado" which allows the air to go up through the center
while the water swirls down around the outside.
I bought plenty of the connectors and my goal is to collect enough
bottles to allow each kid to make one at school (with the option of
food coloring and glitter in the water!) and take it home. Parents,
please bring in empty 2-liter bottles!
I bought the connectors (40 for $40) at teachersource.com. I
recommend you try somewhere else because they took forever to ship,
and when I got them I found out that they leak. I was able to prevent
leakage by wrapping the bottle threads with masking tape first, but I
shouldn't have to do that. I went cheap because I wanted a large
quantity. If you just want one or a few, Artec Educational has a
clear one (so you can see what's happening through the connector) for
$2 each.
Friday, December 2, 2011
Turn! Turn! Turn!
At the elementary school, we continued our theme of learning more
about how things move, in preparation for designing the playground at
the new school site. Tomorrow, we have an optional field trip to the
Berkeley Adventure Playground to see what other kids have designed and
built. Today, we focused on spinning things.
We started with a spinnable chair. A volunteer sits in it and holds
two weights close to his/her chest while I spin up the chair. Then I
ask the volunteer to extend his/her arms as far as possible. The
chair then spins much more slowly. Arms in: the chair speeds up
again. Arms out: slows down again.
I ask the kids what else they have seen which is like this.
Surprisingly, no one said figure skating. I had to nudge them a bit
to realize it is just like the figure skater who brings her arms in to
spin rapidly. A lot of them did refer to playground equipment,
though. There is a public playground near the school (to which they
sometimes walk for lunch/PE) which has something like that, and I
think now they will have a new appreciation for it. But why does
pulling in your arms speed you up?
We had talked four weeks ago about how more massive things are more
difficult to accelerate. And to decelerate. In short, they have more
inertia. Rotational motion has an added complication. Rotational
inertia involves not only how much mass there is, but how far it is
from the center of rotation: the further from the center, the greater
the inertia. So it is much easier to spin up something whose mass is
concentrated near the center, compared to something of equal mass
whose mass is far-flung. The property of being spun up, which
physicists call angular momentum, is conserved so that a slowly
spinning far-flung object can easily be transformed into a rapidly
spinning concentrated object. Here's an analogy: I can have a certain
volume of water, but it results in a taller water level if it is put
in a skinny glass than if it is put in a wide glass. Here the volume
of water is analogous to the angular momentum (both are conserved),
and the height of the water level is analogous to the rate of
rotation.
Next, I gave them a chance to apply this new principle. I had a set
of two rods of the same size and mass, one of which secretly had most
of its mass concentrated near the middle, and the other of which
secretly had most of its mass concentrated near the ends. You grasp
the center of each rod in either hand, and rotate them back and forth.
There is a startling difference in the resistance to rotation! Once
each child had a chance to feel it, I asked them to come up with
hypotheses as to why one is easier to rotate. Surprisingly, the
connection was not instant. (I wonder how often words are a dead
giveaway. I used the word "rotation" here, but in class I just said,
"go like this." I bet if I had said "rotate the rods" something would
have clicked. But this something would not have been understanding of
physics! Asking questions with familiar terminology leads students to
"solve" problems they don't really understand, and make both teachers
and students overconfident in how much understanding has been gained.)
Many students insisted that the rods did not weigh the same, despite
my assurances. Next time, I should bring a scale to prove it!
Some students were able to guess that it had something to do with how
the weight was distributed (at least that's how I rephrased what they
said), or that something inside the hard-to-turn rod moved (which it
didn't, but I think they were on the right track in thinking that a
similar effect would be produced by some of the weight moving from the
middle toward the ends). I had to give quite a few hints, in one case
sitting on the demo chair and stretching my arms back and forth. We
finally established that we could explain the behavior by supposing
that one rod had most of its mass on the end and the other had most in
the middle. I pointed out that we had just used what we could see to
figure out something about what we couldn't see directly. That's
pretty cool, and that's what science is about.
Next, we took a bicycle wheel and I passed it around. Each student
felt that it is easy to change the orientation of the wheel (in other
words, change where its axis pointed) when the wheel is not spinning,
but quite difficult to do the same thing when the wheel is spinning.
This is another manifestation of conservation of angular momentum.
The rotating wheel seems to fight back; you have to do a lot of work
to change its direction. I asked in what real-life situations they
might have noticed the same thing. "Bicycle wheel" was a very popular
answer, but they couldn't pin down what about a bicycle wheel was
relevant. I had to hint a bit before they realized that this is why
it's easier to stay up on a bike when you're moving faster. When
you're not moving, the wheels can just fall over. When you're moving
fast, changing the axis of the wheels is not so easy, so you find it
easier to balance.
The same bicycle wheel can be used for a really neat demo. Sit on the
spinnable chair, hold the bicycle wheel so it's vertical, and have
someone spin the wheel. Now, when you turn the wheel so it is
sideways, the change in angular momentum gets transferred to the
chair, which begins to spin. Now flip the wheel over, and the chair
begins to spin the other way! This is the rotational equivalent of
two ice skaters pushing off each other and sliding off in opposite
directions.
Finally, I showed them a model of a merry-go-round, to the center of
which I had attached a spring with a small mass on the end. They
predicted that upon spinning the turntable, the mass would go toward
the outside (which it did), but they were not able to articulate
precisely why. I reminded them of the donutapult experiment four
weeks earlier: objects travel in straight lines unless acted upon by a
force. If an object is on a merry-go-round and does not hold on,
travel on a straight line means sliding off the merry-go-round. The
spring was there to prevent losing the mass, and when the turntable
slowed, the spring pulled the mass back toward the center, as the kids
predicted.
We talked about how to apply these ideas in designing a
playground. Some of the ideas were far-fetched, but that's ok! I
didn't want to discourage creativity. We also talked about space and
astronauts. Muscle and bone become very weak after extended periods
in space, and one way to provide artificial gravity to counteract this
is to spin a space station. Because everything inside "wants" to
stick to the rim of a spinning space station, the people inside will
feel like the outside edge of the station is "down", and that there is
gravity pulling things that way. And one child remarked that if you
still need some zero-g environment in the space station, you can put
it inside the axis of the spinning part. One child also asked about
stars, and I explained how some stars which are much more compact than
the Sun (neutron stars) rotate much more rapidly, as often as 30 times
per second! We know that because we can see a hot spot for a brief
period during each revolution.
Friday, November 18, 2011
Playground Design 101
The motivation for the next few visits to the elementary school is
that the kids are going to help design the playground for their new
school site, so I'm going to show them a bit about how things work, ie
classical mechanics. One thing I love about this school is that the
teachers frame things this way. Instead of just hearing that "today
we're going to be learning Newton's laws of motion" students have this
wonderful backdrop to keep them motivated and (perhaps more important)
foster creativity. The laws of mechanics will be a springboard to
creating something wonderful, not a straitjacket of rules we have to
memorize.
We set the foundation last time with
Newton's laws of motion exemplified in the simplest possible situations,
to make them as clear as possible. This time, we added complications to
show how interesting it can be when forces interact. I concocted three
different examples of interacting forces and set up three
stations. Each group of 6-8 kids split into 3 groups of 2-3 and spent
5 minutes at each station, with 5 minutes left at the end for group
discussion.
Station 1: I repeated the pulley activity from last week at Primaria.
I rigged up different pulley arrangements to lift identical 20-pound
weights. One arrangement was just a single pulley at the top as you
might expect, reversing the direction of the rope so that the kids
could stand on the ground and pull down on the rope to make the block
go up. The second arrangement had the end of the rope tied at the
top, running down to an "upside down" pulley attached to the block,
and then back up to a pulley at the top which acted much like the
single pulley, just reversing the direction of the rope. The kids
tried both setups and compared the difficulty of lifting the block.
The second arrangement is much easier, but why? I challenged the kids
to go beyond simple explanations like "two pulleys are better than
one" and "there are two ropes pulling up the weight so it's twice as
strong." The latter statement starts to get to the answer, but is by
no means a complete answer. If I have to drag something with a rope,
tying two ropes to it doesn't make it any easier.
The trick is to observe closely what happens when you pull. The
moving pulley makes it so that if I pull my end of the rope one foot,
the weight moves up half a foot. This means that you only need half
the muscle that you need with the fixed pulley. (This is called
"mechanical advantage" but I did not use that term.) This was not too
easy for the elementary kids; in fact I think last week the pre-K/K
kids did better, possibly because the three-station setup this week
was very distracting. They were able to extrapolate how to make it
even easier to lift (add more pulleys) but we didn't have time to
discuss how we would connect those extra pulleys, which would really
probe understanding. This could be a good home activity for
interested parents and kids: set up a 4-pulley system so that it's 4
times easier to lift a given weight. How do you set it up, and how
much rope will you have to pull to lift the weight 1 foot? (Advice:
don't try to connect 4 separate pulleys, because the ropes will easily
get twisted and tangled. Buy two "double parallel pulleys" so that
everything stays more or less aligned.)
Also note that in each case, one pulley exists only to reverse the
direction of the pull. You could simplify the comparison by thinking
about standing on a deck and pulling a weight straight up (no pulleys)
vs. tying one end of the rope to the deck, running it around a pulley
attached to the weight, and then pulling up on the other end. Here it
is clear that to get the weight up to the deck, you will need to pull
a length of rope which is twice the height of the deck. But the
benefit is that you need only half the strength to pull the rope.
Station 2: an overhead pulley with an adjustable amount of weight
attached to the rope on each side. This can be used to emphasize a
few different concepts. First, balance: when the weight on each side
is the same, neither side moves. This might seem boring, but it is
actually an easy way to move weight up and down. In balance, it takes
only a tiny amount of strength to move one side up or down, because
you are not moving any net weight up or down. This is how elevators
work: there is a counterweight so the motor doesn't have to work so
hard. This also provides safety in case the motor breaks: the
counterweight is always there and needs no power to function.
Wouldn't it be fun to have some kind of human-powered elevator on the
playground?
Second, this station can serve to reinforce ideas about force and
acceleration (Newton's laws of motion). When there is only slightly
more weight on one side, the net force due to gravity is small, and
that side accelerates downward quite slowly. But with a relatively
small counterweight, the the net force due to gravity is large, and
the heavy side accelerates downward quite rapidly. It's kind of like
a seesaw with rope, which makes it relevant to the playground.
See the Wikipedia article on the Atwood machine for a nice diagram,
and this video demonstrating the small acceleration when the weight is nearly the same on each side.
Third station: this was very much like a small seesaw, with a meter
stick balanced on a pivot at the center. The kids could hang weights
of various sizes at various distances from the center. They were
supposed to figure out that a small weight placed far from the center
could balance a much heavier weight placed close to the center.
However, five minutes was not enough time to absorb this. In many
cases it took them just a few minutes to figure out that if one side
of the balance beam is down, piling more weight on that side doesn't
help balance it! And others were not cognizant that the weights came
in different amounts, from 5 to 50 grams, and just counted the number
of weights rather than the total amount of weight. (OK, I know the
gram is not technically a unit of weight, but we have to keep things
simple!) So in the future I would structure the balance beam as a
complete activity in itself, and define a series of goals starting
from a very basic level. This time, I can forgive myself because I
only had one setup, which wouldn't have worked for 6-8 kids. Anyway,
with the balance beam station I also brought the discussion back to
the playground. What fun things could they design which might involve
balancing big things on one side and small things on the other? Maybe
a balance beam for kids to hang from and balance each other?
After the stations, we had a 5-minute wrapup for each group of 6-8
kids, discussing some of the nuances I wrote about above, which were
missed in the quick 5-minute rotations. This is the first time I
tried having small groups work on different things, and I have to say
it was hectic. Thank goodness the school is well staffed! I had at
least one teacher or or aide or intern rotate in with each group,
which saved the whole thing from being a complete organizational
disaster.
After all the groups rotated through, the kids reassembled in one big
group for circle time, and I asked for 5-10 minutes to do a few demos. I
did these in the big group because (1) there was no time to do it
during the rotations; and (2) the kids would have fought over these
things if it had been a hands-on activity. First, I showed a rod with
a heavy ball on one end and a light ball on the other end, and I asked
how I should place the rod so that it balances on my finger. Not
everyone answered near the heavy ball! So it was worth demonstrating.
But the really cool part is that if something is well balanced, it
will rotate nicely. So I showed how it spins about its balance
point very smoothly and for a long time, whereas it clearly would not
spin nicely about the center of the rod. Here's a video: (apologies for
the appalling quality of the video. I figured it was more important
to help parents see what their kids saw than to worry about looking
good.)
Second, I demonstrated Newton's cradle. This again relates to forces,
and a large version would make a really cool addition to a playground.
(Note: if your kids have studied pendulums, Newton's cradle may be best
understood as a kind of pendulum.)
To wrap up, I asked for their ideas on the playground. After taking a
few, we ran out of time, and we agreed that kids would draw their
concepts during free-choice time. In two weeks, I'll return to the
elementary for some activities involving rotation, and the next day
we'll take an optional family field trip to the Berkeley Adventure
Playground which has "many unusual kid designed and built forts,
boats, and towers." Then we'll get to work more seriously on
designing our own playground!
Saturday, November 5, 2011
An object in motion...
So it's time for the elementary kids to learn Newton's laws of motion.
The key for good demos and hands-on activities is getting rid of
friction, so we can see how objects behave in the absence of forces.
I usually use hover pucks, devices that look like very big hockey
pucks but have a fan inside so they float on a cushion of air, like
air hockey without the table. (They are also sold under the brand
name Kick Dis.) But I decided we would have more fun and soap up a
table so that we could slide anything without friction. The night
before, I started soaping tables to see how frictionless I could get
them. The result was a lot of frustration. I could never really get
them frictionless, not close enough to make convincing demos. I even
tried soaping a large sheet of glass (one of the mirrored sliding
doors on my closet) and that was better, but still not good enough.
It seems that no table or mirror is quite flat enough; objects will
glide along a bit, but then hit a high point and stop. So I ended up
going to bed late and frustrated, with some mess still to clean up in
the morning. Such is the life of an educator.
So Friday morning quick I went to work and picked up a bunch of
hoverpucks. (I also bought some donuts for the donutapult; see
below.) I had already picked up some carts which looked like very
large skateboards. On a smooth floor or sidewalk, these are
reasonably frictionless and safe to kneel on.
After scouting the school to find the smooth surfaces, I set up a
three-stage plan for each group. We started at the long, smooth table
with the hoverpucks. I asked the kids what they knew about friction,
and then I asked them to rub their hands together to feel friction.
Then I slid a switched-off hoverpuck on the table (it went a very
short distance) to show that friction is why it's hard to slide
things, and I asked them for ideas to get rid of friction. After
entertaining various ideas, I asked them to make predictions for how
the hoverpuck would move after I switched it on and pushed it toward
the other end of the table. Then I did just that, and it went in a
perfectly smooth straight line. So this makes it clear that, in the
absence of forces, objects in motion continue their motion (in a
straight line at constant speed). This is Newton's first law of
motion, but I didn't ask them to remember that. We had too many cool
experiments to do, and I can count on the regular teachers to review
the terminology several times!
So I seamlessly continued with the hoverpuck. I asked a child seated
along the middle of the table to give the puck a sideways tap as it
passed her down the long axis of the table. First time with a small
tap, then with a larger one, and each time I asked the kids to predict
the subsequent motion. This sequence shows a few things. First, that
a bigger force (or tap, or push) causes a bigger acceleration (change
in motion, whether it be a change in speed or direction...mostly
direction in this case), which is part of Newton's second law.
Second, a force changes the motion only while the force is being
applied. The tap changes the direction of the puck, but only while
the tap is applied. After the tap, the puck follows its new direction
in a straight line. A one-time tap cannot make it keep curving
around. This reinforces the first law: while there are no forces, it
goes in a straight line at constant speed.
To wrap up the hoverpuck activity (which was only the first of the
three stages I had planned), I gave each child a hoverpuck and asked
them to figure out how to make it travel in a circle (which is
distinct from spinning). They needed this bit of playing to relieve
the wiggles, because to this point it had been mostly demo, with some
assistance from 1-2 kids. After several minutes, we discussed how the
only way to make the puck go in a circle is to keep your hand on it
and move your hand in a circle. In other words, circular motion
requires a continuously changing direction of motion, and therefore a
continuous force. This bit isn't strictly necessary if we just wanted
to do Newton's laws, but it connects to the next stage and some other
interesting ideas in the next paragraph.
Second stage: we went outside and I made a bagel-on-a-string go around
in circles over my head. I asked them to imagine what would happen if
the string broke. If they really got Newton's first law, they would
answer that it would fly off in a straight line, but of course most
people don't grasp it that well after just the first demo. So some
said it would fall straight down, a few said it would fly off in a
circular motion, etc. So now comes the really fun part. It's not
practical to cut the string, so instead I tie a donut to a string, and
the string cuts its own way through the soft donut as I whip it around
over my head. I ask them to observe well, because once the donut
comes free there's only a split second before it hits the fence, or a
tree, or a person! Of course it flies off in a straight line:
Newton's first law strikes again. Then I ask them to think of
anything else that moves in a circle. Sometimes I have to hint "in
space", but they can guess Earth around the Sun, or the Moon around
the Earth. So that's the proof that there is a force keeping the Moon
around the Earth: if there were not, the Moon would fly off in a
straight line. (This comes as a revelation to many adults and college
students...they were never helped to make the connection between real
life and Newton's abstract laws of motion.) Then I ask them what the
name of that force is, and in each group at least one child knew it
was called gravity.
Third stage: we went to the sidewalk for the cart activity. First,
each child gave a push to an unloaded cart, and then the same size
push to a cart loaded with 40 pounds of weights. The heavier cart
accelerated much less. This is the other facet of Newton's second
law: acceleration is proportional to force, but inversely proportional
to the mass of the object being accelerated. The phrase "same size
push" is an attempt to make "same force" sound less technical. Some
kids initially seemed to interpret it as "make the cart accelerate the
same amount" so I made sure to counter this by continually repeating
phrases like "use all the same muscles" or "push just as hard as last
time." In cases where they still didn't quite get it, I asked if they
ever got so mad at their brother (or sister, or friend) that they
wanted to push them. Yes, you can admit it! Pretend the cart is your
brother, you are mad, and you push him. Now, for the other cart,
you're still just as mad, so push just the same!
Also, a common misconception is to look at how far the cart travels as
a measure of the effect of the push. We must not do this, because how
far it travels is a complicated function of how much friction there
is, whether it had to roll over a small stone or a crack, fight a gust
of wind, etc. No, we must observe how fast the cart was moving
immediately after the push.
Finally, we get to Newton's third law. I need two volunteers, one to
kneel on each cart. Alone, each child can't get his or her cart to
start moving. But they can if they push against each other, and this
results in equal and opposite accelerations if I wisely chose
volunteers of the similar mass. This shows that forces come in equal
and opposite pairs, which is Newton's third law. (The usual
formulation, "Every action has an equal and opposite reaction," is
very misleading because it gives the impression that the net result is
zero.)
After giving each child a turn at this, we had a minute or two left in
some of the groups, so we did a more advanced third-law demo. I got
on a cart and held a bathroom scale, while I gave the child on the
other cart a bathroom scale. We pushed off each other's scales, and
her cart accelerated a lot while mine accelerated only a little. I
had asked them to predict the accelerations, and they invariably get
that right. But then I asked them what they thought the forces (the
readings on the scales as we pushed) were: more on my scale, more on
hers, or the same? They invariably think more on mine, because I'm
bigger and so they think I must exert more force. But the scale
readings are the same, which is just Newton's third law! The effect
of the force (the acceleration) is different because she has little
mass and I have a lot, but the amount of force is the same.
Similarly, in a car collision, where the massive vehicle decelerates
relatively little while the light vehicle decelerates a lot; this can
only happen if the forces are the same!
The kids seemed to really like these activities. In fact, Becca told
her mom so, and Becca is hard to impress. The only thing I would do
differently is not buy such cheap bathroom scales. They constantly
had to be re-zeroed, and were not very reliable or accurate. But stay
away from the digital ones too, which you have to step on, step off,
step on again, etc. These would be frustrating for kids in a pushing
experiment.
Subscribe to:
Posts (Atom)