Thursday, April 18, 2013

There is a season


At the end of last Friday's session with the 3-4 graders we discussed
the seasons. It's natural to think that winter is when we are farther
from the Sun, but is that true?  What evidence can we reason with
here?

Well, for one, we know that when it's winter in the northern
hemisphere, it's summer in the southern hemisphere.  That's a pretty
good clue that the seasons are not caused by the Earth getting closer
to and farther from the Sun.  What else?  One boy, to my amazement,
specifically mentioned that if/when we are closer to the Sun, it
should appear to be bigger, and it doesn't appear to be bigger in
(northern) winter.  I was pretty surprised, but then I recalled that
he had recently seen the movie Agora.  This is a trenchant
observation: the Sun actually looks smallest (as seen from anywhere on
Earth) in January, indicating that January is when Earth is furthest
from the Sun. (You can't see this just by looking, because the Sun is
so blindingly bright and it's a fairly small change, but you can use a
pinhole camera to do it.)


Most people (these kids included) "know" that seasons are caused by
"tilt," but what does that really mean?  It's very useful to take a
globe (on a standard stand tilted by the right amount) and make it
orbit a light source to see how this plays out.  The tilt actually
points to the same place in the sky (judging by the stars) all the
time, but since Earth goes around Sun (or vice versa, it doesn't
matter for this point), for part of the orbit the tilt points the
north pole toward the Sun.  This is northern summer, when there is
midnight Sun near the north pole, and longer daylight hours in
northern latitudes generally.  (You can see this by spinning the globe
in the aforementioned model. Make sure to keep the north pole always
pointing toward the same place in the room, like the clock on the wall,
even as it goes around the "Sun.") Six months later, the Sun is on the
opposite side of Earth (relative to the stars) so it's the south's
turn to have summer and the north pole has constant darkness.  In
between those two extremes, neither hemisphere is favored.

So we are NOT tilted closer to the Sun.  The tilt merely allows the
Sun to shine a greater or lesser fraction of the time on a certain
hemisphere, depending on where the Sun is relative to this constant
tilt.  (This fits the evidence that whatever hemisphere has summer, it
does not see the Sun as closer and bigger.)  Translated into what we
see on the ground, it means that summer is when the Sun rises earlier
and sets later, and goes higher in the sky at noon.  You can see all
these things with the globe and light setup.  I had had the kids keep
a sketch of the position and time of sunset or sunrise each week for
the past six weeks, and these data match the model I just described.
I'll analyze that in a bit more detail, and explore the Moon's orbit
around Earth, in my next visit to the school.

Wednesday, April 17, 2013

Turn! Turn! Turn!


This spring I am assigned to work with the Peregrine School 3-4
graders on astronomy, and last Friday was my first day, so I started
with basics like how we know the Earth spins.  We tend to feel
superior to people in the past who believed that the Sun went around
the Earth but, really, how can you use basic observations to show that
it doesn't?  I suspect that most people on the street would be stumped
by this if I didn't allow "satellites" or "NASA" as an answer.

If we only had the observation that the Sun rises and sets every 24
hours, we wouldn't be able to conclude anything.  Each star also rises
and sets in roughly (later we'll see why I say roughly) 24 hours, so
based on pure majority rule, it might be easy to attribute the
apparent motion of the Sun and stars to Earth spinning.  This model
invokes only one thing (Earth) moving, vs the other model invokes a
grand conspiracy of everything else in the universe circling us at an
agreed-upon rate of once every 24 hours.  Sounds like a no-brainer,
but why don't we feel Earth moving?

The kids had lots of ideas in response to this question. It moves so
slowly we can't feel it? No, its circumference is about 24,000 miles
so if it spins in 24 hours its equator must move 1,000 mph.  It moves
so quickly we can't feel it? Gravity?  Centrifugal force? It's so big
we don't feel it move?  There were so many ideas about this that I
decided to explore Galilean relativity: if you are in a laboratory
moving at constant velocity, there is no experiment you can do to
prove you are not actually stationary.  Think about a smooth flight in
an airplane.  If you drop something does it fly backward, indicating
that you are actually traveling at 500 mph?  No, it falls straight
down.  Unless you look out the window, you can't tell that you're
moving---there is NO experiment which will tell you this.  If you do
look out the window, all you can conclude is that you are moving
relative to Earth...there is no experiment you can do that says Earth
is stationary and you are the one who is moving.

This was a pretty new and shocking idea for the kids, so we spent a
long time discussing it.   I remembered a great video I had seen
demonstrating one aspect of this, so I sketched it out and asked them
to predict what would happen.  Say you have a pitching machine which
shoots baseballs at 100 mph, but you mount this machine in the back of
a pickup truck which goes 100 mph the other way.  What will the ball's
speed be, relative to people on the ground? 200 mph? 100 mph?  Zero?
We analyzed this until break time, then after break I showed them the
video.  Mythbusters also did a similar thing, which you can see much more clearly.

The bottom line is that velocities are relative.  So if everything in
your vicinity is moving together at the same speed, it can all be
considered stationary.  This applies to your vicinity on Earth:
although Earth's rotation causes different parts of Earth to move in
different directions and speeds, the part that you experience at any
one time is so small that to high precision it's all moving at the
same speed in the same direction. (When winds move air over hundreds
of miles, that air does eventually feel the effect of Earth's
rotation, the Coriolis effect.)

So not feeling Earth's spin is not a valid argument that it must be
still.  But how do we prove it spins? The Coriolis effect is one way,
but I considered that too advanced for this audience.  Instead, I
explained the Foucault pendulum, which many of them had seen but
probably didn't realize the significance at the time.

Next, we tackled Earth's motion through space.  Spinning is not enough
to explain all our observations, because the stars rise and set every
day slightly faster than the Sun, which means that over time the Sun
loses more and more ground to the stars, and over the course of a year
we see the Sun make one complete circle around the sky relative to the
stars.  What could explain this?  Well, maybe the Sun does go around
Earth, in addition to Earth spinning. But maybe the Earth goes around
the Sun. How could we tell the difference?  I'll get to the bottom of
that next time I visit the school, but for the time being I wanted to
focus on other changes throughout the year and tie them all together
into a coherent model.  I'll post that part of our discussion soon.


Friday, March 29, 2013

Cold and Clammy

After spending most of the morning studying the dynamics of sand along California's beaches,  I had about 30 minutes left to tie up some loose ends I had left on my last visit.  On that visit, I had promised that I could catastrophically crush an aluminum soda can using just heat and cold, but it didn't work.  As soon as I left the school that day, I realized what I had done wrong, but instead of just explaining what I did wrong, I planned some activities to build up to an explanation.  The first was measuring the dew point in the room. (Note: there are lots of dew-point activities written up on the web; I'm just linking to a random one here out of laziness.  In particular, I saved time compared to the activity in this link by starting with cool rather than warm water.)  The dew point was about 10 C, in a room with a temperature of about 20 C.  I also had them answer some questions related to dew point, such as: Which city would you rather travel to, one where the dew point is 50 F or one where it is 80 F?  Explain why, and suggest a plausible location for each city.

Then we related dew point to relative humidity. I wanted to make a graph of amount of water that air holds, vs temperature of the air.  At any temperature, there is a maximum amount it can hold, so I can sketch this maximum amount as a curve which changes with temperature.  I elicited from them how I should sketch it: the warmer the air, the more water it can hold. On that same graph, how would we represent the air in this room? We know it's 20 C, and we know the amount of water in the air is substantially less than the maximum---if it were close to the max we would have seen condensation very quickly as soon as we began to cool the glass.  So I made a mark indicating that conceptually.  As we cooled the glass, we lowered its temp, so I drew a line going leftward from that point.  When it hits the max curve, it condenses.

So the dew point is an indication of how much water is in the air, but what we feel as humidity is really how much water is in the air relative to the maximum it could hold at that temperature. This is called relative humidity.  For example, the dew point was about 10 C, or about 50 F, and in a 70 F room that doesn't feel humid.  But in a 52 F room, that would feel clammy as well as cool.  So I asked the kids to brainstorm how they could build a device to measure relative humidity.  To my surprise (because I was hearing some whining) someone came up really quickly with the idea of a wet thermometer.  I said "Brilliant!" and tried to elicit more details.  Why is being wet important?  Because then there will be evaporation.  OK, how will evaporation change your thermometer reading?  There was much discussion of this, with about half the class leaning toward warmer and half toward colder, but eventually I steered them toward thinking about getting out of a swimming pool and feeling cold as all those little water drops on your skin evaporate.  The thermometer will definitely read a colder temperature! So how does this help you determine humidity? Well, if the air is very humid already, there won't be much evaporation, so the wet thermometer won't read much colder than a dry thermometer.  If the air is very dry, there will be a lot of evaporation and the wet thermometer will read much colder than a dry thermometer.  So we did the experiment, and we found about 16 C (61 F) for the wet one and 20 C (70 F) for the dry one.  Then we find a table which tells us the relative humidity as a function of dry-bulb temp and the temperature difference between dry and wet bulbs.

Now for the grand finale. I reminded them how much a substance expands when going from liquid to gas.  Similarly, when a gas condenses to liquid, it occupies much less volume.  So I put a small amount of water into an empty aluminum soda can, heat the can with a torch so that the gas in the can is mostly water vapor, then plunge the can upside-down into an ice bath.  The water vapor in the can condenses quickly.  Suddenly, there's a lot of empty space in the can, and it collapses catastrophically because the pressure on the outside of the can (standard atmospheric pressure) is so much greater than the pressure on the outside of the can (very little because the gas is gone).  When I tried to do this demo previously, I was not cognizant of the key role of condensation and I put very little ice into a giant pail of water, virtually guaranteeing that I would not get condensation.  You can see a video of this kind of demo here.  It was a satisfying conclusion.  Three kids wanted to take crushed cans home for keepsakes.


A River of Sand

Today was my last day with the 5-7 graders.  We spent most of the time learning about beaches: how sand gets there and how sand moves once it's there (California grade 6 standard 2c).  It's a lot more interesting than you might think, and it's explained well in this video.  Normally I show just short clips of videos, 30 seconds or a minute here and there to support whatever I want to talk about; a lot of "educational" videos have a lot of fluff surrounding the critical part(s).  But I found this video to be packed full of good visualizations of what's going on with beaches, far better than I could set up myself, and very little fluff.  So we watched all 20 minutes (ok, I skipped the fluffy first 80 seconds), and I highly recommend it for parents too.  Aside: It's from the 1960's, and told in the "voice of God" style strongly reminiscent of the films I was shown when I was in elementary school.  Science videos today are quite different, typically with a friendly host just like us who wants to take part in experiments just like we do.  That's probably an improvement on average, but I experienced some nostalgia for the "voice of God" style as I watched it. 

After the video, I set the kids to work on the "Rollin' Down the Sand Highway" activity from this packet (the last activity in the packet).  I didn't provide maps, but just looked them up online as needed.  Some kids had never seen a topo map before, so I explained that in context.  But for most of the time most of the kids were stuck on the math, which surprised me because the math is pretty simple.  I guess it's a question of applying math outside of math class!  It's always easier to apply a concept when you've just learned it and you know that the problem you've been given can be solved using that concept.

More specifically, the students did not have a clear idea of how to go about converting cubic yards of sand per year to dump trucks per minute.  I led them through  the easy step of converting cubic yards per year to dump trucks per year, and I thought this would give them the boost they needed to complete it on their own, but I was wrong.  As I circulated around the room helping students, it came out that we would need to know how many minutes per year, and the students were able to come up with that number (although they may have Googled it on a mobile device behind my back): 525,600.  But there was a huge amount of confusion regarding whether they multiply or divide by this number, and whether the result would be dump trucks per minute or minutes per dump truck.  I walked them through how I think about it, and they stared at me totally lost; I stared back wondering how they could not have seen this before.  So I backed up and (much wailing and gnashing of teeth omitted here) found a way to get it across. 

Here's what worked: let's say that you are asked to compute 3 times 4, divided by 7 times 3:

3x4
----  = ?
7x3

The kids universally said the following: multiply across the top and also across the bottom:

3x4     12
----  = ---
7x3     21

This surprised me because it's not what I would do, but once I figured out that one kid was thinking like this, I repeated it for all the kids.  Although the answer surprised me, it's not wrong, so let's continue along these lines and see what happens.  The natural next step is to simplify the fraction 12/21: is this its simplest form?  The typical answer from a student was: ...um...well, I don't see any common factors.  And of course it's hard to see the common factors when you're staring at 12/21.  But if instead you look at

3x4    
----  =?
7x3    
the common factor of 3 is jumping up and down screaming "I'm a common factor!"  So cancel the 3's and you immediately get 4/7.  This is not only much less work than writing 12/21 and then trying to simplify; it avoids the potential for a lot of mistakes.  Although this kind of thing is second nature to me, it was not natural for the kids, who were intent on following the specific rules they had learned about multiplying fractions.

I had to go through all this just to get to the main idea: we can do the same kind of thing with items like dump trucks and minutes instead of specific numbers.  We are given dump trucks per year and we want to get dump trucks per minute, so we can represent the problem like this:

dump trucks      ?         dump trucks
--------------- x   --   =   ---------------
year                     ?           minute


We have to get rid of years and introduce minutes, so if we put years per minute in the question marks, we get:

dump trucks      year           dump trucks
--------------- x   -----     =   ---------------
year                   minute           minute

The years on the left cancel each other, leaving dump trucks in the numerator and minutes in the denominator.  If we had instead tried:

dump trucks      minute           dump trucks
--------------- x   ---------    =   ---------------
year                      year                 minute

this equation is manifestly false; the right hand side should contain dump truck minutes on the top and years squared on the bottom. This kind of thinking seemed to be new to the 6th graders, and I'm glad I did it because it's really important.  It provides a system for making sure you do the right thing.  Don't know whether to multiply by 525,600 or divide by 525,600?  One system popular among the students was to just try one approach, and then if the teacher says it's wrong, just do the other!  But here's a system which makes clear that we have to multiply by years/minute, or 1/525600. And not sure if the resulting number represents dump trucks per minute or minutes per dump truck? Again, the system makes clear that the result is dump trucks per minute.

Another thing the kids need to internalize much better is sanity checking.  If you multiply 722,222 cubic yards by the $5 per cubic yard it costs to remove, you should get a number bigger than 722,222, not less than 722,222.  The kids didn't apply this kind of sanity checking to any of their results, and therefore didn't catch any of their mistakes before showing their answers to me.  This was the first math-based activity I had really done with the upper-graders, and I was probably naive to expect that they could apply math outside the context of a math class.  I should have given a little primer on how to estimate before calculating, how to check that your answer is right after calculating, etc.  This is not really math; it's metacognition in a math context, and I'm now kicking myself for not emphasizing metacognition throughout this trimester with the upper graders.

In any case, we spent a lot of time on this activity: 1 hour, including the movie, before break; then maybe another 20 minutes after break.  It was worth it to work through these issues, but then I did have to cut down on my planned post-break activity.  I'll dedicate the next blog post to the humidity-related activities we did in the last 30 minutes of the morning.


Wednesday, March 20, 2013

Making Clouds in a Bottle

As our final activity in our March 12 physics-behind-the-weather extravaganza, we made clouds in a bottle, pretty much as shown in this video.  This experiment shows that to form clouds we need three things: humid air, a change in temperature/pressure which brings the air below the dew point, and condensation nuclei, which are provided by particles in the smoke we waft into the bottle.  Without these, water droplets tend not to form; see the Wikipedia article on supersaturation.

After many minutes of squeezing to see the clouds form and releasing to see the clouds disappear, they tended to stop forming.  I think that must be due to the particles being driven into the liquid water rather than floating in the air.

This was a relatively quick (~15 minutes) activity, but I was surprised at how the kids had problems getting the smoke into the bottle.  They didn't think about how the bottle had to exhale before it could inhale the smoke.  I didn't trust the kids with matches, so I was quite busy servicing the kids as they each tried to get smoke multiple times.  My advice to teachers is to have several adults help if you do this with a larger number of kids.

Friday, March 15, 2013

Balloon in a bottle


This is a great demo for making air pressure dramatically visible.
The "bottle" is a special flask with a hole in the bottom. Stuff most
of a limp balloon into the neck of the flask, mount the balloon's neck
onto the flask's neck, and inflate the balloon.  When you take your
mouth off the balloon, it deflates, of course.  Ask your audience to
predict what will happen if you put the stopper in before taking your
mouth off.  Now inflate the balloon again, insert the stopper in the
hole at the bottom of the flask, take your mouth off, and TA-DA!  The
balloon does not deflate, despite having its mouth held wide open by
the neck of the flask!  This is really an astounding demo, and people
are delighted every time I do it.

The key to understanding this is that inflating the balloon pushes air
out of the flask through the hole in its bottom.  With no stopper, air
rushes back in through the same hole when the balloon deflates. But
with a stopper, pulling air back in to the flask is not possible. As
soon as the balloon deflates just a tiny bit, the same amount of air
in the flask must occupy a larger volume, which means it lowers its
pressure.  Each square inch of latex in the balloon's surface now
starts to feel a higher pressure from the inside of the balloon than
from the outside of the balloon, so it can't deflate any more.
(Experts: I am purposely omitting surface tension to keep it
simple for a young audience.)  If you now remove the stopper, it
quickly deflates by drawing air into the flask through the newly made
hole.

There are further variations such as pouring water in the balloon
before removing the stopper (which creates a nice squirt of water when
you do remove the stopper).

If you can't find this specialized flask, you may be able to do a
similar demo with a regular bottle by using a straw in parallel with
the balloon to vent the bottle as you inflate the balloon.  From the
videos I've seen, it takes some dexterity and practice to do this and
remove the straw to prevent further air flow at the critical moment,
but it is doable.

I did this Tuesday with the upper-graders at Peregrine School to
introduce pressure to our study of weather.  Pressure is related to
temperature; pumping up a bike tire shows that compressing a gas
raises its temperature, and there are demos I will describe in a
future post which show how cooling a gas makes its pressure drop.  So
hot air masses are associated with high pressure, and cool air masses
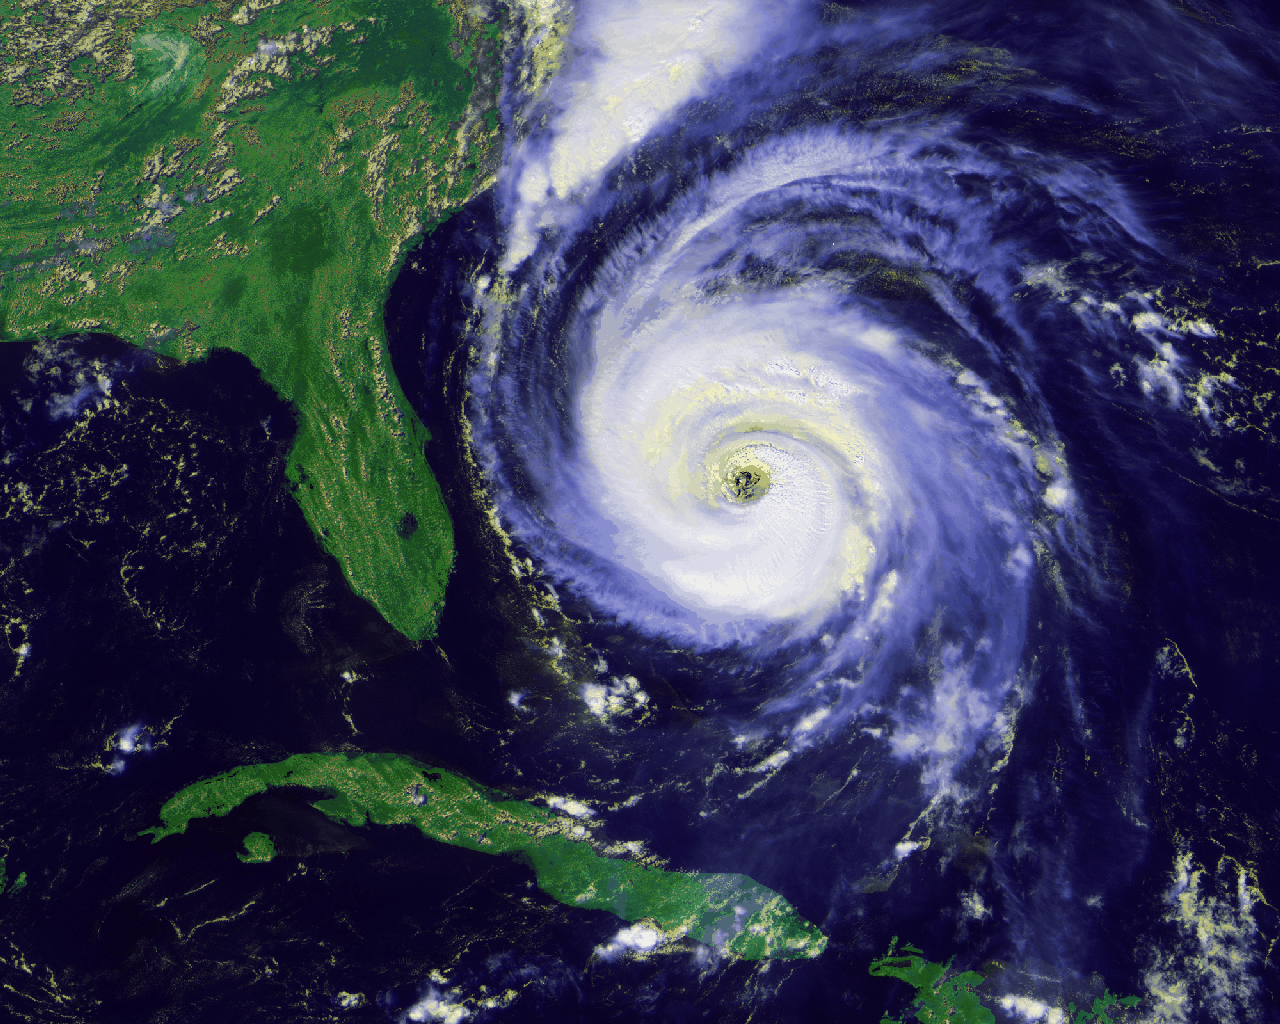
(and storms) are associated with low pressure.  In low-pressure storms
like hurricanes, air is pushed from higher-pressure regions on the
periphery toward the center.  Combining this with what we had just
learned about the Coriolis effect, we see that in the northern
hemisphere air will be deflected to its right, making a
counterclockwise circulation which is easily seen in satellite images:


In the southern hemisphere, air is deflected to its left as it tries
to go from outskirts to center, thus creating clockwise circulation.
We saw in our previous activity that the Coriolis effect cannot
determine the circulation in toilet bowls because a few inches' travel
is too small to be affected by riding on the 12,000-mile
merry-go-round we call Earth.  But over hundreds of miles, the
Coriolis effect does build up and cause these wind patterns.

The next and last activity in our  physics-behind-the-weather extravaganza was making clouds.

Thursday, March 14, 2013

Coriolis Effect


After learning how convection makes air "want" to circulate from
equator to pole at high altitudes and back from pole to equator at low
altitudes, we learned how that idealized picture of air flow is
modified by the Coriolis effect.

I won't explain the effect here, because there are plenty of good Web
resources on that, with MIT providing perhaps the best demo.  As a
teacher, my quandary was whether to simply show the video of this
demo, or to try to actually do it in class. I took a risk on the
latter, and it worked out amazingly well.  I built something like the
contraption shown in the MIT video, by borrowing a sturdy turntable (a
low one, much lower than a pottery turntable, so that a fall from it
would not hurt) and clamping a 2"x12"x8' plank to it.  I put a kid on
each end, asked them to take some practice throws, and the spun it and
had them throw at will.  They had a blast! Everyone insisted on taking
a turn---multiple turns---so we had plenty of chances to explore the
effects of different variables, such as direction of rotation, speed
of rotation, and distance over which the ball travels.  When break
time arrived, the kids just kept playing with it, and kids from other
grades also came in the room and demanded their turn.  I can honestly
say this was the most fun science activity I have done with kids.
They begged me to leave the device at school, but I did not leave it
because it would require constant adult supervision to keep it safe.
I strongly urge anyone teaching the Coriolis effect to do this
activity. The activity described in this post took about an hour, but
kids could play with this device for many hours.  If you don't think
you can build one, a merry-go-round should provide a good substitute.

Back in discussion mode, we took some time to understand that Earth's
northern hemisphere is like a merry-go-round spinning
counterclockwise, so when low-altitude air tries to circulate from
pole to equator it gets deflected to the right and becomes a wind from
the northwest, whereas when high-altitude air tries to circulate from
equator to pole it gets deflected to the right and becomes a wind from
the southwest.  This means that one giant circulation cell from
equator to pole and back is not feasible; it gets broken up into three
cells, from equator to about 30 degrees latitude, from 30-60 degrees
latitude, and from latitude 60 to the pole:

(Image from Wikipedia)


The sourthern hemisphere is like a merry-go-round spinning clockwise,
so its air circulation cells (called Hadley cells) are a mirror image
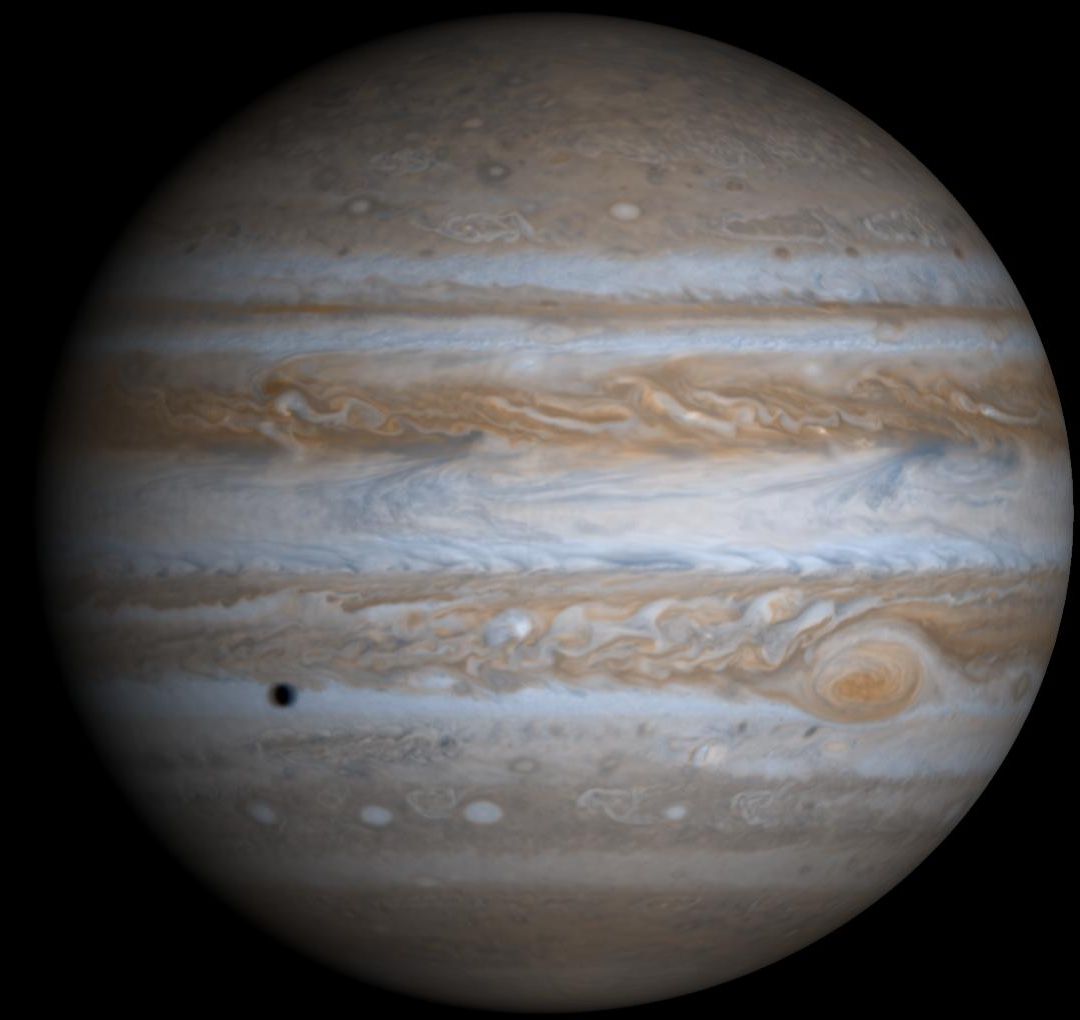
of the north's.  On a faster-spinning planet such as Jupiter, the Coriolis effect
is much stronger and therefore the equator-to-pole tendency is broken up
into more cells.  Each cloud band in this photo represents a cell:


An important thing to note about the Coriolis effect is that it does
not determine the direction of toilet flushes.  Our experiment showed
that when traveling distances which are short compared to the diameter
of the merry-go-round, the ball is not noticeably deflected.  Water
traveling a few inches from rim to center of a toilet ball is
traveling only a tiny, tiny fraction of the Earth's diameter, so the
Coriolis effect cannot be important.  What is important is how water
is injected into the bowl.

I reinforced that idea by showing this video from a travel documentary,
whose producers and stars are completely taken in by locals living on the
equator purporting to demonstrate that water drains in different
directions just north of the equator vs just south of the equator.  As
you watch this video, can you spot a major mistake the locals make?
Also, can you explain how the locals got the water to drain in
different directions at will?

In the next activity, we explored how the Coriolis effect also explains why storms like hurricanes circulate counterclockwise in the northern hemisphere and clockwise in the southern hemisphere.